
Let’s EncryptでWEBサーバをhttps化(1)
MyDNS.JP の DDNS で独自のサブドメインを取得し、ローカルネットワーク内の名前解決にDNSサーバを立てたりした話を書きましたが、WEBサーバへ、宅内であってもドメイン名でアクセスできるようになりましたので、次のステップ(順番では無いですが)として、WEBサーバをLet’s Encryptでhttps化してみたいと思います。

Let’s Encryptは、何度かテーマとしてますので、この辺りを見て頂ければ良いかと思います。
何かとお金のかかるイメージのある証明書を、無料で発行して頂けるありがたいサービスです。
WEBサーバからの申請
申請には前提(事前準備作業)があって、外から、http://ドメイン名 で、アクセスできる状態であること、です(ローカルネットワークで名前解決できている必要はありません)。家庭では、ルータの設定を変更して Port 80 をWEBサーバのIPアドレスに通すようにしておく必要があります。
certbotのインストール
Let’s Encrypt は、サーバ上で certbot を起動させて認証させるのが一般的です。
root権限が必要ですので、共有レンタルサーバでは難しいですね。その話は別に記載しています。
例によって CentOS 7 のサーバ上での開設になりますが、EPELリポジトリからのインストールになります。
アンチウィルスソフトとして、Clam AntiVirus をインストールしていれば、既にEPELからのインストールに対応できているでしょうが、無ければ、EPELリポジトリの導入から。yumリポジトリにEPELを追加します。
# yum install epel-release次いで、本題のcertbotのインストールです。
# yum install certbot python-certbot-apache証明書の作成
次のようなパラメータを追加して、certbotを動かします。
# certbot certonly --webroot -w /var/www/html/ -d www.●●●.live-on.net -d mail.●●●.live-on.net-w は、/etc/httpd/conf/httpd.conf で設定している DocumentRoot の場所、
-d は、サブドメインを含めた、証明書を取得したい対象のドメインです。このオプション、複数のサブドメインを同時に取得できるのがポイントですね。ちなみに、mail. は、新たなテーマ「メールサーバ構築」用に、事前に取得しておくものです。WEBサーバと同じ仮想サーバ上で稼働させる予定です。(逆に、www. は、その時点で、実質的には稼働を停止させる予定にしています)。そんな話は本筋とは関係ないので、先に進めます。
# certbot certonly --webroot -w /var/www/html/ -d www.●●●.live-on.net -d mail.●●●.live-on.net
Saving debug log to /var/log/letsencrypt/letsencrypt.log
Plugins selected: Authenticator webroot, Installer None
Enter email address (used for urgent renewal and security notices)
 (Enter 'c' to cancel):
メールアドレスの入力を求められています。証明書の期限切れ等々の通知に利用されるアドレスですので、普段から確認できるメールアドレスを入力します。
Starting new HTTPS connection (1): acme-v02.api.letsencrypt.org

- - - - - - - - - - - - - - - - - - - - - - - - - - - - - - - - - - - - - - - -
Please read the Terms of Service at
https://letsencrypt.org/documents/LE-SA-v1.2-November-15-2017.pdf. You must
agree in order to register with the ACME server. Do you agree?
- - - - - - - - - - - - - - - - - - - - - - - - - - - - - - - - - - - - - - - -
(Y)es/(N)o:
規約に同意するかを問われます。記載のPDFを見ないといけないんでしょうが…。すみません、見てません。。
進めるため、 Y を入力します。
- - - - - - - - - - - - - - - - - - - - - - - - - - - - - - - - - - - - - - - -
Would you be willing, once your first certificate is successfully issued, to
share your email address with the Electronic Frontier Foundation, a founding
partner of the Let's Encrypt project and the non-profit organization that
develops Certbot? We'd like to send you email about our work encrypting the web,
EFF news, campaigns, and ways to support digital freedom.
- - - - - - - - - - - - - - - - - - - - - - - - - - - - - - - - - - - - - - - -
(Y)es/(N)o:
certbot開発をしている ElectronicFrontier Foundation のメーリングリストになるのでしょうか、登録するといろいろな情報を得られるらしいです。これは好き好きで。
私は、 N を入力しました。これで、発行までの手順は完了です。
Account registered.
Requesting a certificate for www.●●●.live-on.net and 1 more domains
Performing the following challenges:
http-01 challenge for mail.●●●.live-on.net
http-01 challenge for www.●●●.live-on.net
Using the webroot path /var/www/html for all unmatched domains.
Waiting for verification...
Cleaning up challenges

IMPORTANT NOTES:
 - Congratulations! Your certificate and chain have been saved at:
   /etc/letsencrypt/live/www.●●●.live-on.net/fullchain.pem
   Your key file has been saved at:
   /etc/letsencrypt/live/www.●●●.live-on.net/privkey.pem
   Your certificate will expire on 2021-XX-XX. To obtain a new or
   tweaked version of this certificate in the future, simply run
   certbot again. To non-interactively renew *all* of your
   certificates, run "certbot renew"
 - If you like Certbot, please consider supporting our work by:

   Donating to ISRG / Let's Encrypt:   https://letsencrypt.org/donate
   Donating to EFF:                    https://eff.org/donate-le

SSLCertificateFile  /etc/letsencrypt/live/www.●●●.live-on.net/cert.pem
SSLCertificateKeyFile /etc/letsencrypt/live/www.●●●.live-on.net/privkey.pem
SSLCertificateChainFile /etc/letsencrypt/live/www.●●●.live-on.net/chain.pem
少し時間をおいて、上のような画面が表示されます。
大事なのは下3行。
ここに、証明書ファイルが格納されています。
WEBサーバに登録する
/etc/httpd/conf.d/ssl.conf を修正します。※変更部分のみの記載です
ServerName www.●●●.live-on.net:443

#   Server Certificate:
SSLCertificateFile /etc/letsencrypt/live/www.●●●.live-on.net/cert.pem
#   Server Private Key:
SSLCertificateKeyFile /etc/letsencrypt/live/www.●●●.live-on.net/privkey.pem
#   Server Certificate Chain:
SSLCertificateChainFile /etc/letsencrypt/live/www.●●●.live-on.net/chain.pem
設定の後は、WEBサーバの再起動。
# systemctl restart httpd.serviceブラウザから、https://www.●●●.live-on.net でアクセスすると、
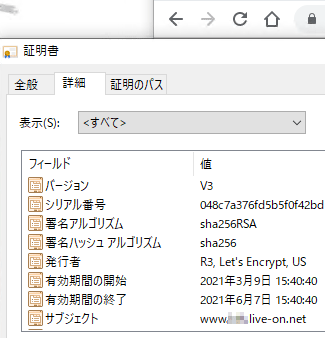
Let’s Encrypt での証明書が有効になっていることが確認できました。